Add/remove (pin/unpin) shortcuts on Pinned Items Area
To add shortcut into pinned items area, right-click a program icon/shortcut (in Start menu or in Windows Explorer. If you do it from Windows Explorer, make sure it is an executable file, ie file with .exe extension), then click Pin to Start Menu. The icon/shortcut is on the pinned area now.
Customizing most frequently used programs area
Related to most frequently used programs area, you can limit the number of shotcuts there, or clean all shortcuts, or remove a shortcut, or you can deactivate that area.
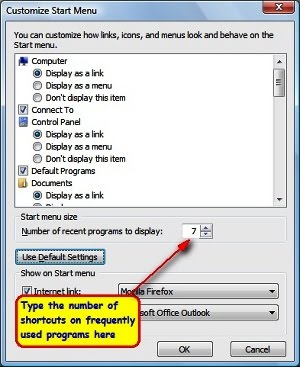
To set number of shorcuts for the most frequently used programs area:
1. Right-click on empty area on taskbar, then click Properties.
2. On the Taskbar and Star Menu Properties window, click Start Menu Tab. Then click Customize button.
3. Under Start menu size text, type the number of shortcuts for frequently used programs. Then click OK button.
To clean all the shortcuts there or to deactivate the area, please do this steps:
1. Right-click on empty area on taskbar, then click Properties.
2. On the Taskbar and Star Menu Properties window, click Start Menu Tab.
3. If you want to clean all the shortcuts, so under Privacy text, clean the check box of Store and display a list of recently opened programs. Then click Apply button. Then mark again the checkbox, and then click OK button. But if you want to deactivate the most frequently used programs area, just leave the checkbox clean and then click OK button.
1. Right-click a shortcut in that area, then click Remove from this list.
2. Now that shortcut has gone.
Customizing the Right Pane
You can customize the right pane of Start menu through the Customize Start Menu window.
1. Right-click on empty area on taskbar, then click Properties.
2. On the Taskbar and Star Menu Properties window, click Start Menu Tab. Then click Customize button.
3. On the Customize Start Menu window specify items to be displayed and how you want them displayed.
4. Click OK button. And then click OK button again on the Taskbar and Star Menu Properties window.
Changing the Start menu to Classic view
If you like using the classic view of Start menu, you can do this steps:
1. Right-click on empty area on taskbar, then click Properties.
2. On the Taskbar and Star Menu Properties window, click Start Menu Tab. Then click Classic Start menu option.
3. Finish it by clicking OK button.
Changing User Account Picture
You can change the picture of user account which is located on top of Start menu:
1. Click Start menu, then click Control Panel.
2. In Control Panel, click Classic View on left pane. And then on the right pane, find and double-click User Accounts.
3. Then on the User Account window, click change your picture.
4. Click the picture you want to use, and then click Change Picture button.
5. Now check the Start menu. The picture has changed.


No comments:
Post a Comment